


Didactum Monitoring Systems
Configure System-Log, Event-Log & Modbus
Complete guide: Evaluate Event-Log, understand error messages, save logs to SD card/USB/FTP/Email/Syslog and integrate external Modbus-TCP & Modbus-RTU devices (e.g. energy meters) – for all Didactum Monitoring units.
System-Log & Event-Log – Overview
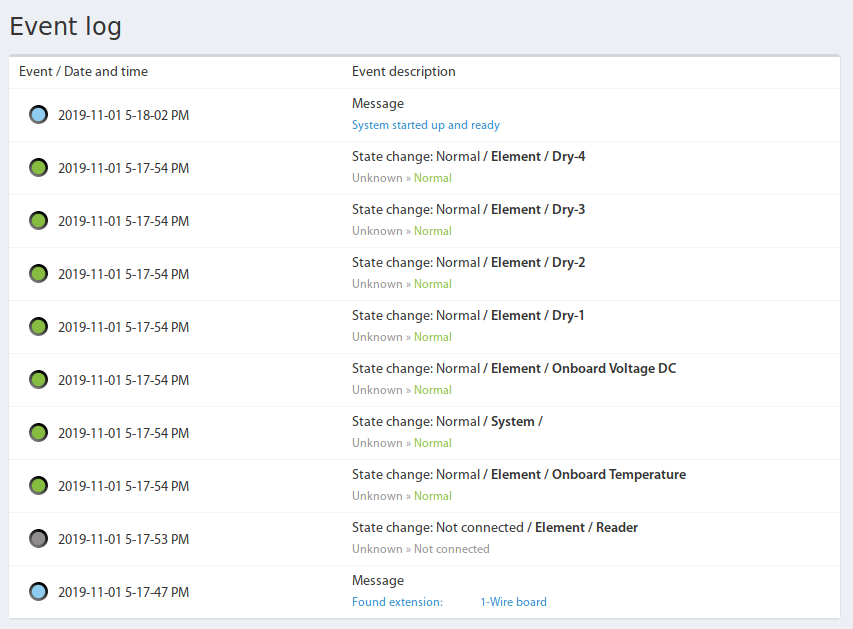
▼A list of the most recent system events can be found under the menu item Event log of your Didactum Monitoring unit. Status changes of sensors, logins, modem connections, mail dispatch and other system events are logged here chronologically.
 🔍 Enlarge
Open the Event log item in the main menu. Each entry shows a timestamp and event text, e.g. status changes of sensors or system messages such as „System started up and ready“.
Event-Log Storage Capacity
The following table shows how many events the device holds in the internal volatile memory – without activated FTP, SD card or USB logging:
| Number of Log Entries | Models |
|---|---|
| 300 | 50T, 100T, 300T, 500T, 550T and PDUs |
Download or Delete Event-Log
 🔍 Enlarge
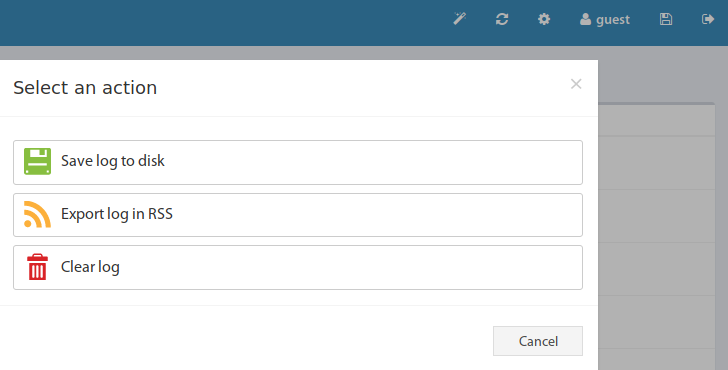
Click the icon in the top right corner of the Event log panel – a window will open with the option „Save log to disk“. Here you can download the current log content or clear the list.
Error Messages in the System-Log
▼This overview helps you to classify common error messages in the System-Log of your Didactum unit, understand their cause and fix them specifically.
Modem / GSM / LTE Errors
| Message | Possible Cause | Solution |
|---|---|---|
+CMS ERROR: 1 – Unassigned number | The called/SMS destination number is formally valid but not assigned or not active. | Check the number and reachability of the recipient. |
| Repeated: „LTE service: connection failed“ / „… established“ | Some providers periodically disconnect inactive connections or perform a routine reset. | Normal provider behavior – the connection is automatically restored after the session ends. |
| „GSM modem: Error, check your SIM card and PIN code“ | No SIM card inserted or wrong PIN. | Check SIM card seating and PIN settings. |
+CMS ERROR: 8 – Operator determined barring | The mobile operator has blocked SMS sending (cause usually unknown). | Register the device via IMEI, manually enter the SMS center number, contact the provider. |
+CMS ERROR: 21 – Short message transfer rejected | SMS alarms are sent with approx. 30 minutes delay. | Manually set the SMS center number; if the provider has several numbers, test all of them. |
+CMS ERROR: 28 – Unidentified subscriber | Subscriber is not registered in the mobile network (IMSI unknown); weak signal, GSM jammer, defective antenna/SIM contact. | Modem firmware is maintained by the manufacturer and cannot be influenced by Didactum updates – check hardware/antenna/SIM. |
+CMS ERROR: 29 – Facility rejected | Service requested by the modem is not supported by the mobile network. | Check and manually enter the SMS center number (Main menu → SMS Messages → SMS Center Number), test another SIM card if necessary. |
+CMGS: 23 / +CMS ERROR: 38 – Network out of order | Technical problem in the mobile network/SMS center, possibly operator spam protection with many SMS. | Check account status and contract conditions with the provider (e.g. blocks for unregistered IMEI). |
+CMS ERROR: 69 – Requested facility not implemented | Usually an error in the SMS center number. | Enter the SMS center number correctly. |
+CMS ERROR: 97 – Message type non-existent | The network received a message whose type it does not recognize. | Manually set up the SMS center number. |
| „LTE service: connection cannot be established“ | No connection to the configured APN could be established after 5 attempts. | Check LTE settings and GSM reception, update firmware to the latest version. |
+CMS ERROR: 500 – Unknown error | Modem not registered, no credit, network overload, wrong center number or bent antenna cable. | Check signal level, inspect antenna cable inside/outside, manually set SMS center number, test another SIM. |
+CMS ERROR: 2172 – State not allowed | Weak signal or SIM card does not support the used network (e.g. 2G). | Use a SIM card with a suitable tariff/network support. |
+CMS ERROR: 2174 – SMS sending failed | Antenna cable possibly came loose during transport, SMS center number not automatically recognized. | Open the housing, connect the SMA antenna cable correctly to the modem; manually enter the SMS center number. |
System Errors
| Message | Cause | Solution |
|---|---|---|
Service 'serialdevd' is broken. The service will be restarted | Serious service error without further context – the “serialdevd” service detects e.g. modem, RS485 and 1-Wire extensions. Possible cause: memory error during a firmware update or USB bus problem. | Check firmware and kernel version; if necessary, reprogram the device (Kernel + Web-UI) or reset to factory settings. |
| „Attention! The Nginx server runs in safe mode. Check your network and IP camera settings.“ | Generated when the internal web server (nginx) has crashed and been restarted. | If the message occurs repeatedly, reinstall the firmware – a previous update may have failed (e.g. due to disconnecting power too early). |
Mail Errors
| Message | Cause | Solution |
|---|---|---|
Send mail 'mailName' error: curl: (7) Failed to connect … port 25: No route to host | An unreachable address is stored in the “SMTP Server” field, or an outdated firmware is being used. | Check reachability of the specified host. |
curl: (6) Couldn't resolve host 'mail.smtp.com' | Non-existent address/name in the “SMTP Server” field or outdated firmware. | Check DNS settings in the network, verify host reachability. |
curl: (67) Error, check your login and password | Login/password incorrect, or the mail provider (e.g. Google) has disabled access for third-party applications. | Check credentials; alternatively use SMTP relay via E-Mail Notification. |
curl: (35) SSL23_GET_SERVER_HELLO: unknown protocol | TLS version error – TLS 1.3 is not supported by devices with 300-series architecture (e.g. 500T). | Use only TLS 1.0–1.2 or specifically disable TLS 1.0/1.1 in the network settings. |
Log Errors
| Message | Cause | Solution |
|---|---|---|
error: Error creating log archive | Known software bug. | Fixed in current drivers/firmware versions – update the system to the latest version, or perform a factory reset as an alternative. |
Camera Errors
| Message | Cause | Solution |
|---|---|---|
Service 'camerasd' is broken. The service will be restarted | Known software bug. | Update the system to the latest driver/firmware version. |
Browser Errors
| Message | Cause | Solution |
|---|---|---|
ERR_SSL_KEY_USAGE_INCOMPATIBLE | TLS support is disabled in the browser while accessing the Didactum unit via HTTPS. | Enable TLS in the browser or select a different TLS version on the device: Settings → Network → “Enable TLS” – use version 1.2 or 1.3. |
Saving System Logs to SD Card
▼With an SD card, your Didactum Monitoring unit permanently logs changes to logs, sensor data and configuration elements – even beyond a reboot.
Which SD Cards Are Supported?
The current devices 100T, 300T, 500T and 550T support SDHC and SDXC cards up to 512 GB. Older devices support SDHC cards with 4/8/16/32 GB as well as (with current families) 64 GB SDXC cards.
 🔍 Enlarge
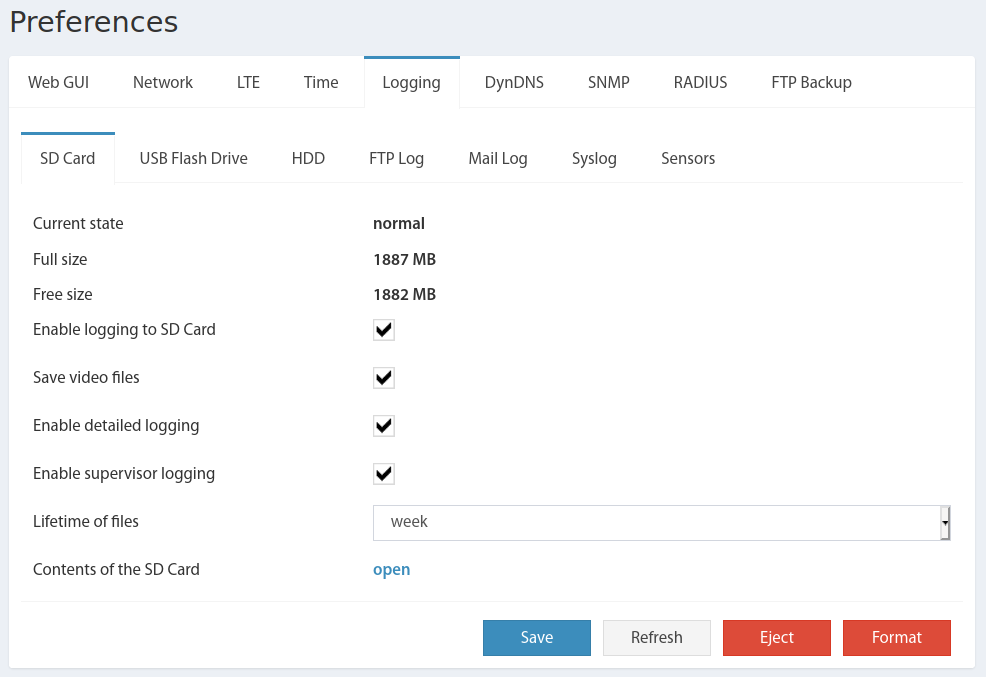
Manage the SD card under Preferences → Logging → SD Card. Displayed are e.g. Current state (Status: normal/ejected/not connected), Mount point, Full size and Free size. The switches “Enable logging to SD Card”, “Save video files”, “Enable detailed logging” and “Enable supervisor logging” are available for activation. Use “Lifetime of files” to define how long files are kept before they are automatically deleted.
The buttons at the bottom of the panel mean:
| Button | Function |
|---|---|
| Save | Saves and applies the logging settings. |
| Refresh | Updates the page display. |
| Eject | Safely unmounts the SD card before removal. |
| Format | Formats the SD card with the FAT32 file system (deletes all data). |
Directory and File Structure
A directory is created on the SD card according to the scheme <Device Type>-<Hostname>, e.g. 100T-DeviceName. If no hostname is set, the IP address is used instead, e.g. 100T-192.168.0.193. Inside this directory, subfolders for log files (log), video files (video), sensor dump files (sensors) and log archives (archive) are automatically created. Log files are created daily and closed at 00:00 (device time) – after a reboot, a new file is automatically started.
Details on the sensor dump files (CSV format) can be found in the section Sensor Dump Files.
Frequently Asked Questions
How many log files can be written to an SD card?
Usually one log file (max. 24 h) is created per day. Up to 10,000 files can be generated – this corresponds to approx. 27 years. The only limiting factor is ultimately the size of the SD card (e.g. 32 GB). The actual file size depends on how many events are logged per day.
How many sensors can be recorded in detail?
In addition to the log messages, sensor data can be written to files – for up to 30 sensors, with a maximum sampling rate of 1× per second. CAN sensors are updated every 10 seconds.
Troubleshooting
| Problem | Cause | Solution |
|---|---|---|
SD card cannot be accessed – Error 403 nginx (System → Logging → SD Card) | SD card is not (correctly) formatted. | Format the SD card with FAT32 via the web interface (see above). |
Saving System Logs to USB Stick
▼Alternatively or in addition to the SD card, a USB flash drive can be used to record logs, sensor data and configuration settings.
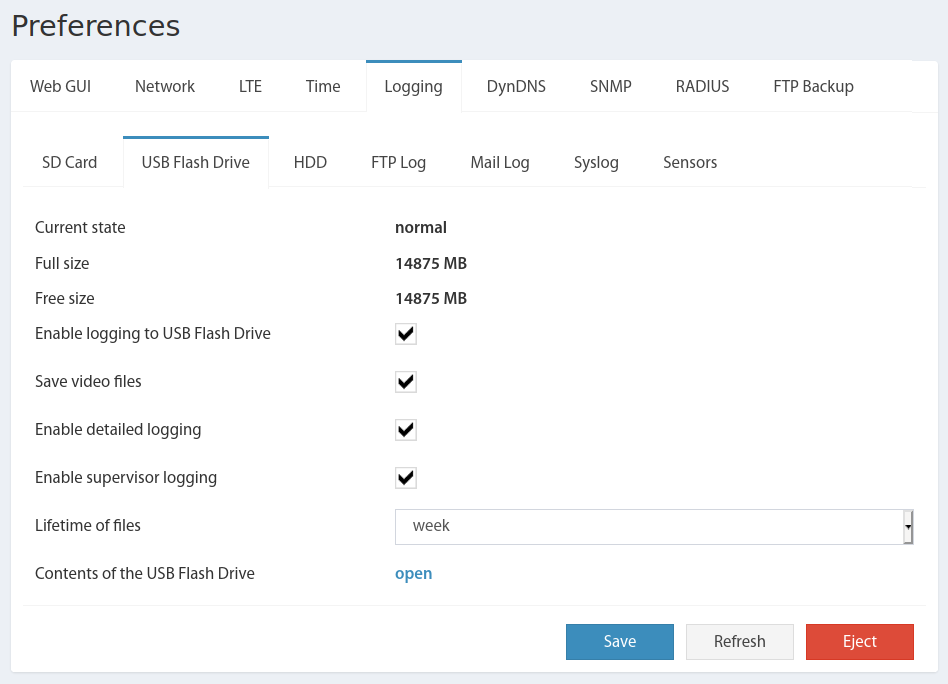
The USB drive is managed under Preferences → Logging → USB Flash Drive. If no stick is connected, some fields remain empty and the status shows “not connected”.
 🔍 Enlarge
Displayed are Current state (normal/ejected/not connected), Mount point, Full size and Free size. Use the switches “Enable logging to USB Flash Drive”, “Save video files”, “Enable detailed logging” and “Enable supervisor logging” to control what is recorded. Under “Lifetime of files” you define the retention period.
| Button | Function |
|---|---|
| Refresh | Updates the tab data. |
| Save | Saves and applies the logging settings. |
| Eject | Safely unmounts the USB stick before removal. |
The file structure is exactly the same as the SD card structure: Directory <Device Type>-<Hostname> or <Device Type>-<IP Address>, containing the subfolders log, video, sensors and archive. Here too, log files are closed daily at 00:00. Details on the sensor dump files can be found in the section Sensor Dump Files.
Syslog Settings
▼Syslog is a standardized protocol (IETF RFC 3164) for transmitting log messages to a central log server – widely used with Unix-like systems, network devices and IoT devices such as the Didactum Monitoring unit. The messages provide administrators with information about events, system status and potential problems.
How It Works
When the Syslog service is running on the device, system messages are generated and sent to a central log server. Transmission is done via UDP on port 514. On the log server, the messages can be viewed, sorted and linked to alerts using a Syslog viewer.
Severity Levels
Each message contains a timestamp, event text and the source IP or hostname and is assigned to one of eight severity levels:
| Value | Severity | Keyword | Description | Example |
|---|---|---|---|---|
| 0 | Emergency | emerg | System is no longer usable. | Should not be used by applications. |
| 1 | Alert | alert | Must be fixed immediately. | Failure of the primary internet connection. |
| 2 | Critical | crit | Critical condition. | Failure of the main system application. |
| 3 | Error | err | Error condition. | An application has reached its memory limit, write attempts fail. |
| 4 | Warning | warning | Can lead to an error if not addressed. | A non-root file system has only 2 GB left. |
| 5 | Notice | notice | Unusual but non-error events. | — |
| 6 | Informational | info | Normal operational messages, no action required. | An application was successfully started, paused or terminated. |
| 7 | Debug | debug | Information for developers for debugging. | — |
Configuring Syslog
- Go to Main menu → Preferences → Logging → Syslog in the web interface.
- Enter the IP address (and port) of your central log server, e.g.
192.168.0.15:514. - Click “Save” to apply the setting.
| # | Option | Description |
|---|---|---|
| 1 | Syslog Server Address | IP address and port number of the Syslog server, e.g. 192.168.0.15:514 |
Sending System Logs to FTP Server
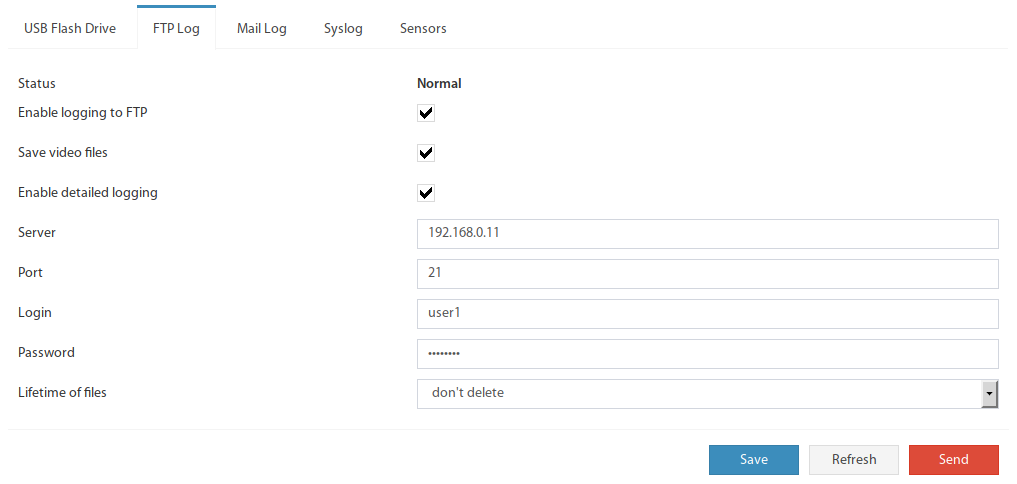
▼Logs, sensor data, configuration settings, etc. can be transferred to an FTP server. The files are first stored locally on the device (SD card or USB stick) and transmitted to the FTP server at 00:00 (device time). Video files (e.g. from a USB webcam) are sent immediately after creation.
 🔍 Enlarge
Manage the settings under Preferences → Logging → FTP Log. Here you can see the connection status and configure server, port and login credentials.
| Parameter / Button | Description |
|---|---|
| Status | Shows the current status of the server connection. |
| Enable logging to FTP | Enables/disables the transfer of log files to the FTP server. |
| Save video files | Enables/disables saving of video recordings. |
| Enable detailed logging | Enables second-accurate recording of selected sensors. |
| Enable supervisor logging | Logs user actions such as logins/logouts and configuration changes. |
| Server | Address/path of the FTP server. |
| Port | Port of the FTP server. |
| Login / Password | Username and password for FTP access. |
| Lifetime of files | Retention period; older files are automatically removed from the FTP server (if supported by the server). |
| Refresh | Updates the tab data. |
| Save | Saves and applies the settings. |
| Send | Sends the currently available log files to the FTP server immediately. |
Sensor Dump Files (CSV)
▼In addition to the general system logs, your Didactum unit can archive the measured values of individual sensors at regular intervals (every second or less frequently) as CSV files.
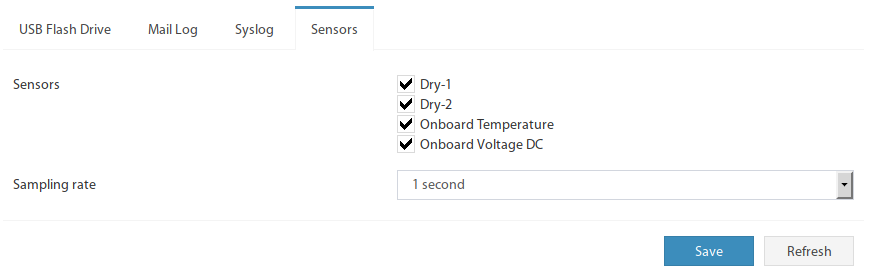
- Enable the checkbox “Enable detailed logging” in the desired logging tab (SD card, USB or FTP).
- Switch to the “Sensors” tab and select the sensors to be monitored – maximum 30 sensors.
- Set the desired recording frequency via “Sampling rate”.
 🔍 Enlarge
This setting affects all storage modes with active “Enable detailed logging” (SD card, USB stick, FTP). The dump files are stored exclusively on SD card or USB stick.
File Structure
In the root directory (on the same level as log) a folder sensors is created. For each monitored sensor, a subfolder is created inside it, named after the sensor ID (e.g. 201001, 101004). The files themselves are named after their creation time and contain the sensor ID as part of the extension, e.g.:
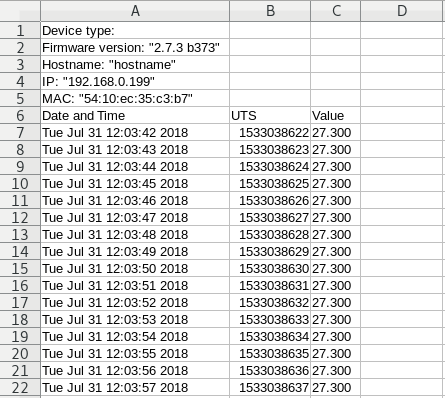
If a sensor is not present, neither a folder nor a file is created. The file is filled periodically (one data block every 30 seconds) and contains the time (human-readable and as Unix timestamp) and the measured value (floating point number with 3 decimal places).
 🔍 Enlarge
The sensor dump files are in a simple tabular CSV format and can be opened with common office and engineering software, e.g. Microsoft Excel, OpenOffice or LabVIEW.
Sending System Logs via Email
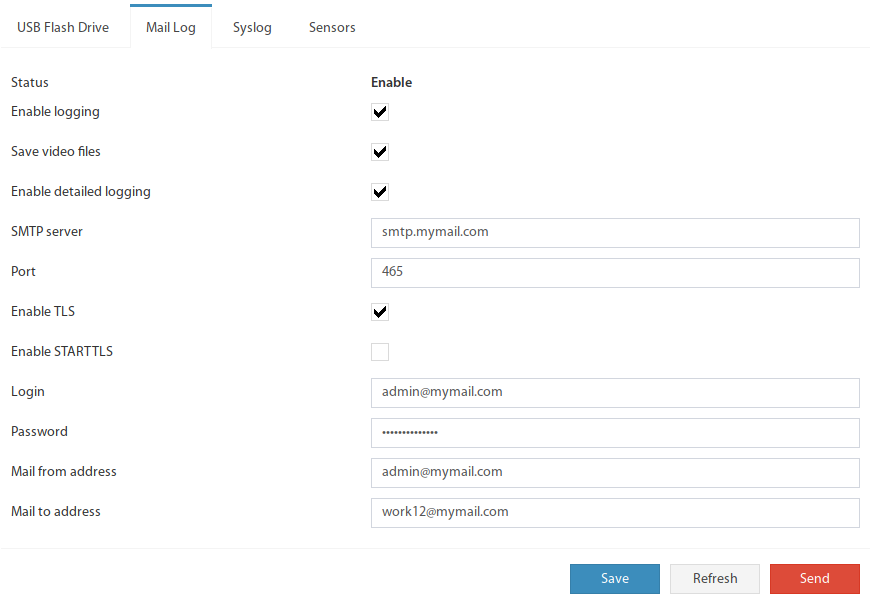
▼Logs, sensor data and configuration settings can also be sent as a compressed archive via email. The files are first compressed in Gzip format (.gz), combined into a TAR archive and sent at 00:00 (device time) to up to 10 email addresses.
 🔍 Enlarge
Manage the settings under Preferences → Logging → Mail Log. Here you configure the outgoing mail server (SMTP), encryption and recipient addresses.
| Parameter / Button | Description |
|---|---|
| Status | Status of the last transmission. |
| Enable logging | Enables/disables sending of the log archive via email. |
| Save video files | Enables/disables saving of video recordings. |
| Enable detailed logging | Enables second-accurate recording of selected sensors. |
| Enable supervisor logging | Logs user actions such as logins/logouts and configuration changes. |
| SMTP server | Address of the outgoing mail server. |
| Port | Port of the outgoing mail server. |
| Enable TLS | Connection is established encrypted from the beginning (typical port 465). |
| Enable STARTTLS | Switches to encryption within the SMTP session (typical ports 587, 25 or 2525). |
| Login / Password | Login credentials of the mail account – can be left empty. |
| Mail from | Sender address. |
| Mail to | Recipient addresses – up to 10, separated by comma, semicolon or space. |
| Refresh | Updates the tab data. |
| Save | Saves and applies the settings. |
| Send | Sends the current archive immediately via email (if available). |